Plan for at least 200GB of free disk before your first Yocto build. As of October 31, 2026, the official Yocto Project 6.0 docs ask for at least 140GB free for a basic core-image-sato build.
My i.MX6 build started on a 60GB partition. Free space fell below 5GB and the build stopped. On a workspace with 200GB or more free, the first clean build finished in about 2 hours 20 minutes.
The Yocto Project is an open-source framework for building custom Linux images for embedded boards. Poky is its reference distribution, and BitBake is the tool that runs the build.
On this page
- How much disk space does a Yocto build need?
- What happened on my 60GB i.MX6 build
- Where the space goes: downloads, tmp and sstate-cache
- Ways to keep Yocto disk usage down
- Is 2 hours 20 minutes normal for a first clean build?
- Rebuild times with sstate-cache and downloads kept
- The Dunfell setup I used, and what changed with bitbake-setup
- What QEMU catches and what only the real i.MX6 board shows
- FAQ
How much disk space does a Yocto build need?
The official disk space requirement is at least 140GB free, according to the Yocto Project 6.0 (Wrynose) system requirements checked on October 31, 2026. I’d still plan for 200GB or more.
That 140GB figure covers one basic image, core-image-sato for the qemux86-64 emulator target. The same page says complex images, multiple builds and build caches need much more.
The number has grown. The Dunfell (3.1) Quick Build guide asked for 50GB of free space. So a 50–60GB plan can look reasonable. Mine didn’t hold up.
| Yocto docs | Free disk asked for |
|---|---|
| Dunfell 3.1 Quick Build | 50GB |
| Wrynose 6.0 requirements | 140GB |
| What I’d plan for | 200GB or more |
RAM matters too. The 6.0 requirements page says a core-image-sato build is possible with as little as 32GB of RAM on an old 4-core system, and more RAM and cores make it much faster.
That rules out some small boxes. An Intel N100 mini PC, for example, tops out at 16GB of memory per Intel’s N100 specifications, a limit I cover in my mini PC home server checklist.
What happened on my 60GB i.MX6 build
The project was a BSP and application runtime environment for an NXP i.MX6 Quad-family board. I set up a 60GB partition and expected that to be enough.
During the first clean build, source downloads, tmp and sstate-cache kept growing. Free space dropped below 5GB, and the build stopped there.
I moved the workspace to a disk with 200GB or more free. Only then did the build run through to the end.
| What | Size |
|---|---|
| Free space I planned for | About 60GB |
| Free space left mid-build | Under 5GB |
| Workspace I moved to | 200GB or more |
Disk was the first thing in my plan I had to redo.
Where the space goes: downloads, tmp and sstate-cache
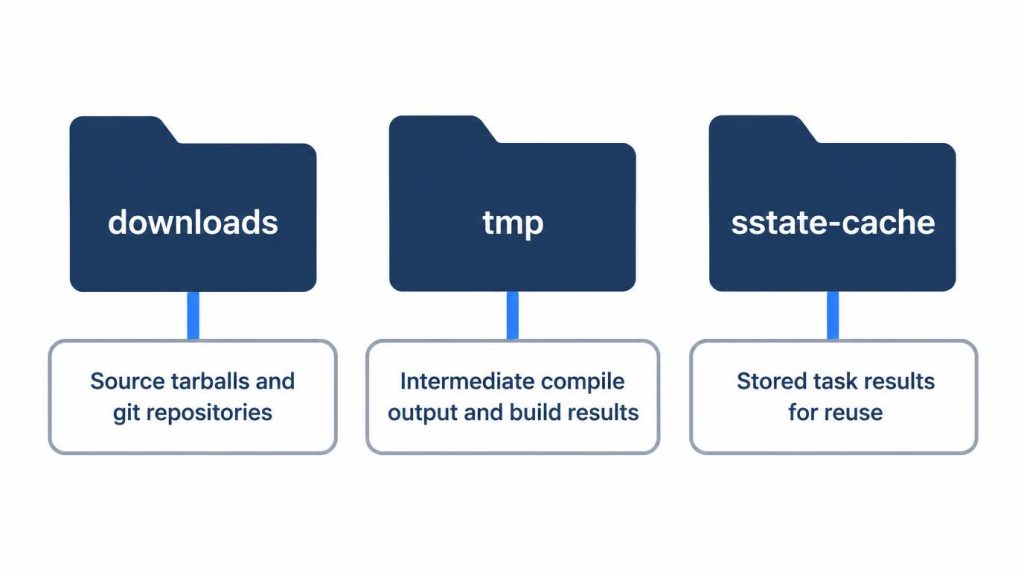
Three directories take most of the space. A single image with a few extra layers can push them into tens of gigabytes quickly.
downloadsholds source tarballs and git repositories exactly as fetched.tmpholds intermediate compile output and the build results.sstate-cachestores the results of tasks you’ve already built, so BitBake can reuse them.
That is why around 60GB of free space runs out so fast.
Ways to keep Yocto disk usage down
Moving to a bigger disk was my fix. The Yocto docs also list a few settings that cut usage. The figures in this section are the docs’ own, not mine.
rm_work. Add INHERIT += "rm_work" to conf/local.conf. It deletes each recipe’s work directory once that recipe is built. In the official Conserving Disk Space example (core-image-sato on Ubuntu 22.04), final usage dropped from 140GB to 22GB. The docs say you still need 40GB of free space at the start for temporary files.
Pruning old sstate files. The same page gives a one-line cleanup that deletes cache files BitBake hasn’t touched in a set number of days:
find build/sstate-cache -type f -mtime +$DAYS -delete
A disk-space monitor. BB_DISKMON_DIRS tells BitBake what to do when free space or inodes drop below a threshold. The actions are ABORT, STOPTASKS and WARN, per the variables glossary. For example:
BB_DISKMON_DIRS = "STOPTASKS,${TMPDIR},1G"
That one lets running tasks finish, then stops the build once TMPDIR has less than 1GB free.
Is 2 hours 20 minutes normal for a first clean build?
A first Yocto clean build downloads sources, builds a cross-compilation toolchain and then builds hundreds of packages, all in one pass. Taking more than two hours is normal.
After the move to 200GB or more, my restarted clean build took about 2 hours 20 minutes. That number comes from one dev machine, one layer set and one image configuration. It won’t carry over as is to your setup.
When I first saw how long it was taking, I thought something had gone wrong. The screen just kept scrolling compile logs, and progress wasn’t clear.
BitBake coordinates the whole run. It works task by task, resolving dependencies and running them in order. With no cache at all, it walks every step from the beginning, so a long first build is expected.
Rebuild times with sstate-cache and downloads kept
After the first clean build, I left sstate-cache and downloads in place. Rebuilding the same image from there felt completely different.
| Scope of change | Rebuild time (my setup) |
|---|---|
| Small recipe or app change (cache hit) | About 5–10 min |
| Change with wide impact | About 30–40 min |
These aren’t general benchmarks. They come from my dev machine and my layer setup, so treat them as a feel for how many tasks the cache lets BitBake skip.
Sharing this cache in CI, and deciding when to rebuild the full image, are separate topics.
The Dunfell setup I used, and what changed with bitbake-setup
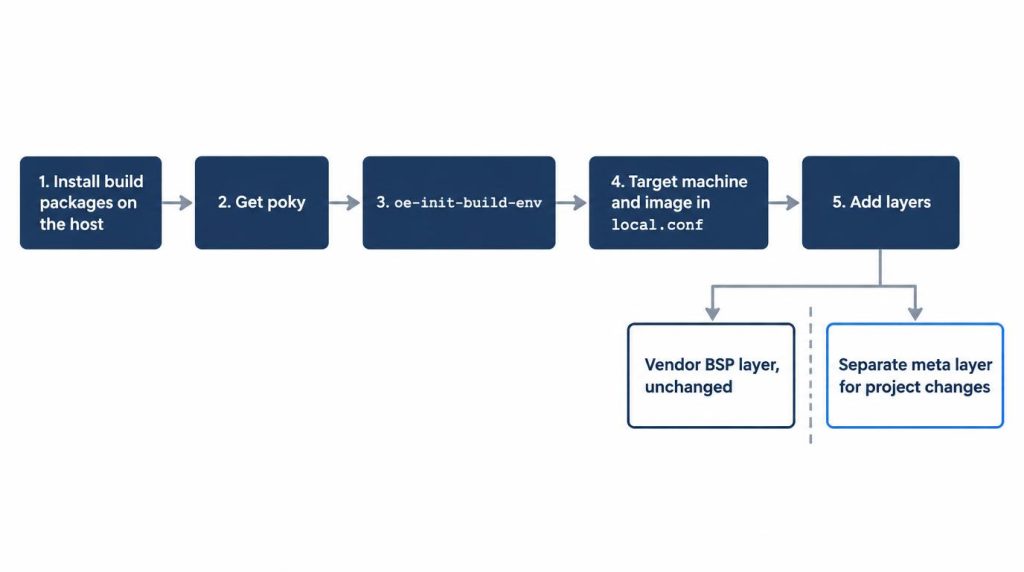
My build ran on Dunfell (3.1). The flow then was to install the host build packages, git clone poky, run oe-init-build-env and set the target machine and image in local.conf by hand.
I added the vendor’s BSP layer unchanged and put the project’s own changes in a separate meta layer. If you edit the vendor BSP itself, you get conflicts every time you pull a BSP update.
How I split the layers, which recipes I added and what I changed with .bbappend belong in another post.
Dunfell is end-of-life now. Its last release was 3.1.33 in May 2024, per the Yocto releases page.
The current LTS releases are Scarthgap (5.0), supported until April 2028, and Wrynose (6.0), supported until April 2030 (release process). Styhead (5.1), in between, was a regular non-LTS release.
The setup steps changed too. The 6.0 Quick Build guide starts with bitbake-setup init and manages configuration with bitbake-config-build, for example bitbake-config-build enable-fragment, instead of hand-editing local.conf.
I haven’t built on these newer versions myself, so this part follows the official docs only. I expect the disk planning and the feel for clean build time to stay about the same across versions.
What QEMU catches and what only the real i.MX6 board shows
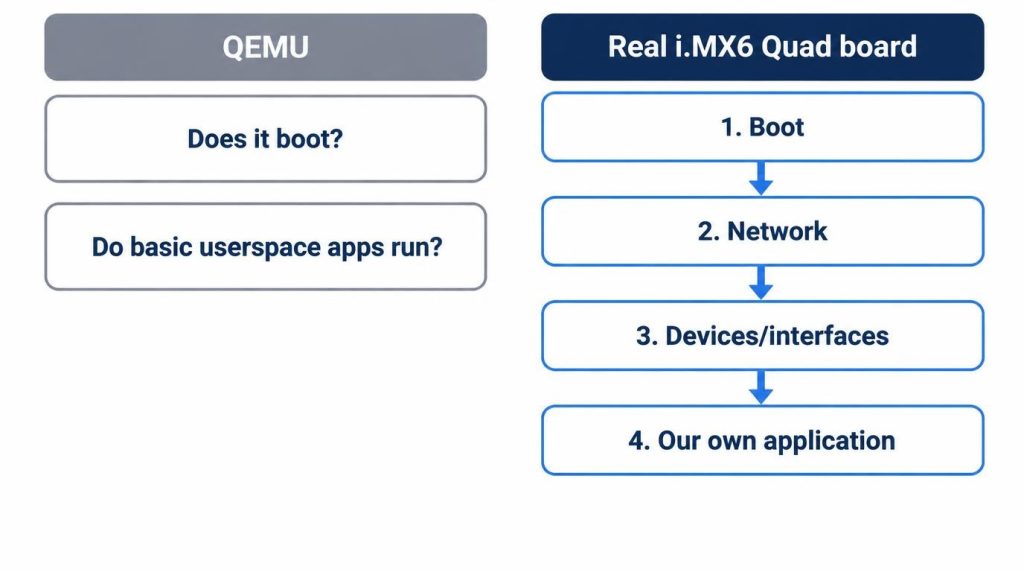
QEMU tells you whether the base image boots and whether basic userspace runs. Device tree, kernel driver and peripheral problems show up only on the real board, because QEMU doesn’t have that hardware.
Booting the built image with runqemu was a quick first filter. It was useful for catching a broken image early.
Passing in QEMU didn’t mean the board would behave the same way. So I always ran final verification on the actual i.MX6 Quad board, in this order: boot, network, devices and interfaces, then our own application.
In my project, passing QEMU wasn’t a completion criterion. On a BSP project, I didn’t call verification done until the real board booted.
FAQ
Can I run a Yocto build in a virtual machine?
You can, but give it plenty of disk and CPU. If the host is short on resources, the clean build can take much longer than 2 hours.
When should I delete sstate-cache?
Keep it in most cases. Delete it only when you make a big change to the Yocto version or layer configuration. Until then, keeping it is what keeps rebuild times down. If it grows too large, the find ... -mtime prune above removes only old files.
Does this apply to boards other than the i.MX6?
Disk size and clean build time feel similar regardless of the board. Real-board checks after QEMU, like the device tree and drivers, differ from board to board, so plan those separately.
Sources
- Yocto Project 6.0 system requirements: at least 140GB free disk and 32GB RAM for
core-image-satoonqemux86-64(checked October 31, 2026). - Yocto Project Dunfell (3.1.33) Quick Build: 50GB free disk in the Dunfell-era guide.
- Conserving Disk Space (Development Tasks Manual):
rm_workand the 140GB to 22GB example, plus the sstate prune command. - Yocto Project variables glossary: BB_DISKMON_DIRS: disk-space monitor actions and syntax.
- Yocto Project 6.0 Quick Build: the current procedure with
bitbake-setupandbitbake-config-build.
Show 2 more sources
- Yocto Project Releases and the Stable Release Process: LTS designation and support periods for Scarthgap (5.0) and Wrynose (6.0).
- Yocto Project releases wiki: Dunfell end-of-life and its last release, 3.1.33 (May 2024).
Related posts
- docker-compose to docker compose: Why CI Broke Again
- AI Agent Used git commit –no-verify: Why I Re-Check in CI
I first wrote this in Korean on my blog: https://jjeongil.tistory.com/213.